In this section we will do a complete step-by-step walkthrough of a traffic example, showing which steps that a computer will go through when it wants to communicate over a computer network. This example will incorporate a lot of information from the other sections and serves as an all-inclusive example.
Most people are surprised to see how many steps that are involved for a computer to be able to just send out a simple packet, and there are lots of steps that are completely hidden to a regular user and which you would never know about unless you knew about them beforehand.
If you have read through most of this website then you probably already have an idea about the number of steps that might be included in this walkthrough.
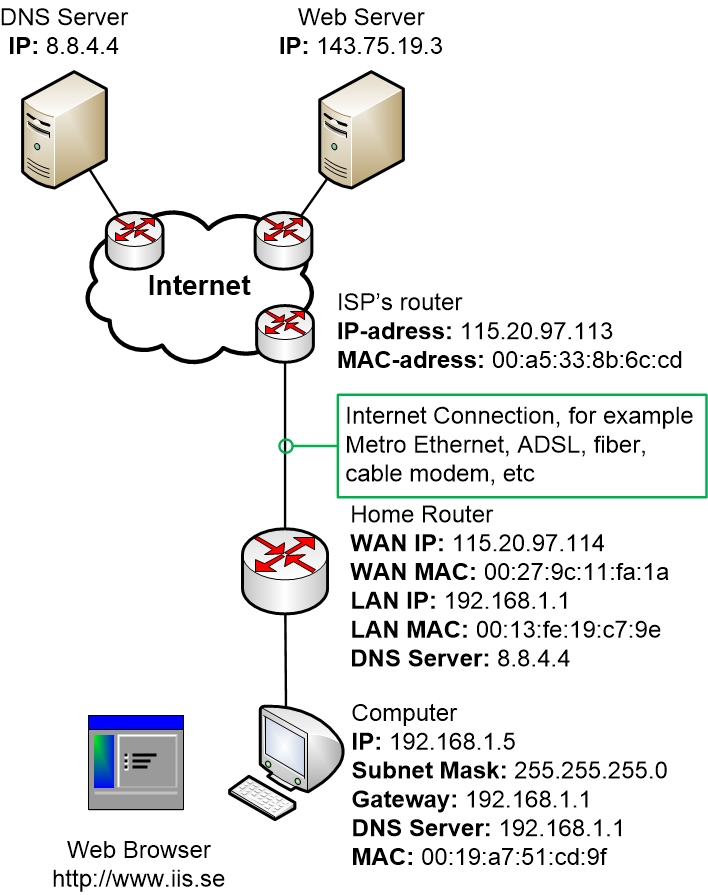
In the example below we will display a small home network where a computer has just booted up. The computer has a manually configured IP address and has not yet communicated on the network. A user sits down by the computer and opens up a Web Browser and tries to browse to www.iis.se
First let’s have a look at the whole picture. This image shows the network topology in the example. Within a lot of the steps, we will zoom in on just the most relevant part of the network to avoid having to draw the whole picture every single time.
Now let’s start with the traffic example walkthrough!
Step 1: The computer wants to send traffic
A computer connected to the home network has just booted up. The computer has a manually configured IP address, Subnet Mask, DNS server and a Default Gateway. Both the DNS server and the Default Gateway address is pointing at the LAN IP address of the home router.
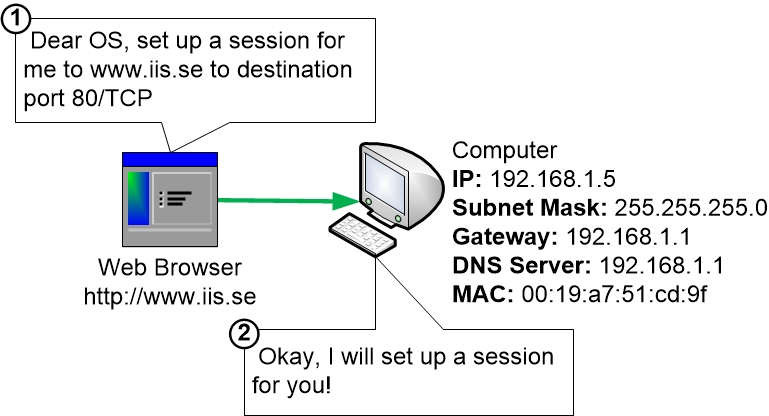
The user of the computer opens a web browser and goes to www.iis.se
The first thing that happens is that the Web Browser instructs the OS on the computer to set up the communication between the computer and www.iis.se
Step 2: DNS
This part is divided into numerous sub-steps
Step 2a: DNS cache
The computer OS checks its DNS cache to see if it already knows what IP address that www.iis.se has got. Since the computer just started up and it hasn’t previously contacted www.iis.se the DNS cache is completely empty.
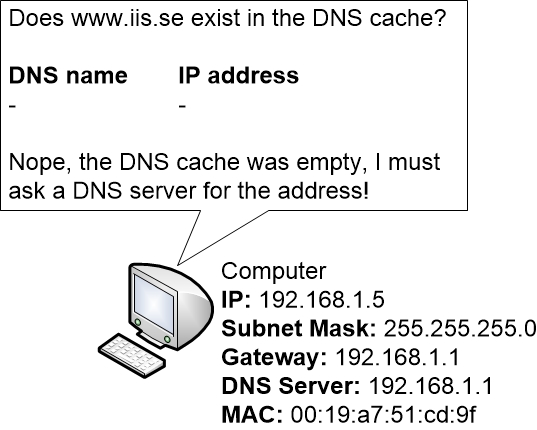
The computer must now ask its DNS server what IP address that www.iis.se has got.
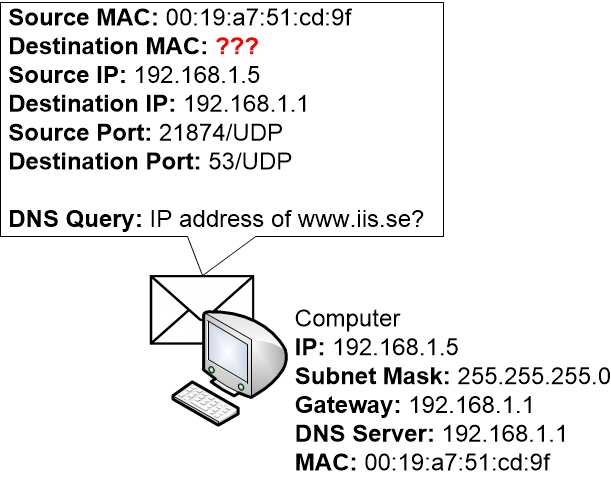
Step 2b: Putting a DNS query together
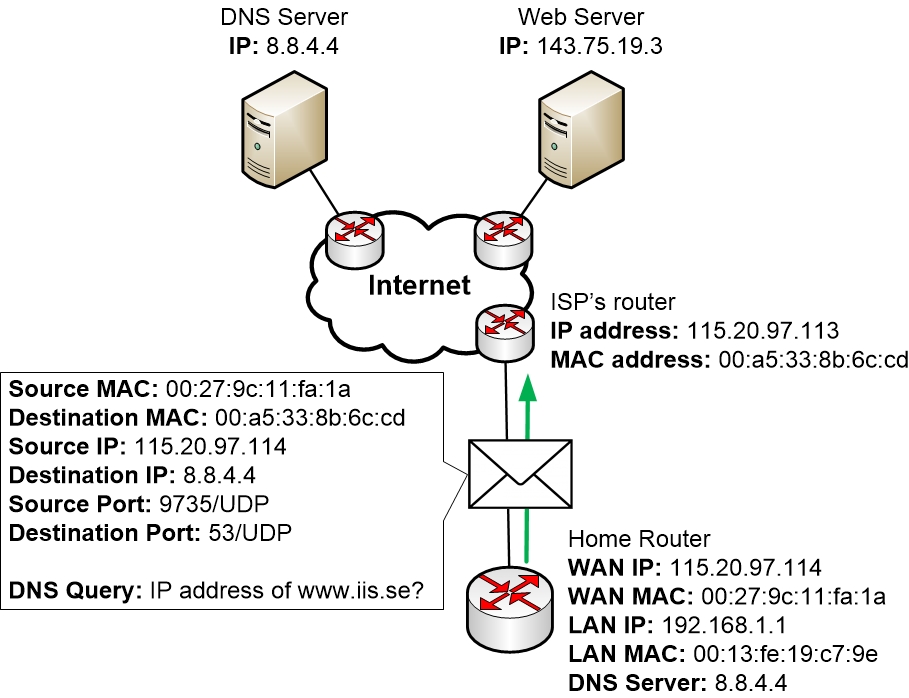
The computer will construct a DNS query that it can send off to the DNS server, 192.168.1.1, that it is configured to use.
The destination address of the DNS query is 192.168.1.1, and the source IP address is the IP address of the computer itself, 192.168.1.5
DNS uses UDP as its transport protocol. The destination port for DNS queries is 53/UDP. Later when the DNS query reaches the DNS server the DNS server will be able to tell by looking at the destination port 53/UDP that the message is intended for a DNS server program, and can forward the message to the running DNS program.
The computer OS must also randomise a source port which is also written into the message.
But when the computer puts the DNS query together it notices that it must check what destination MAC address that it should send the packet to.
So for now, the OS puts the packet in a queue in memory and then starts working on figuring out what destination MAC address to use.
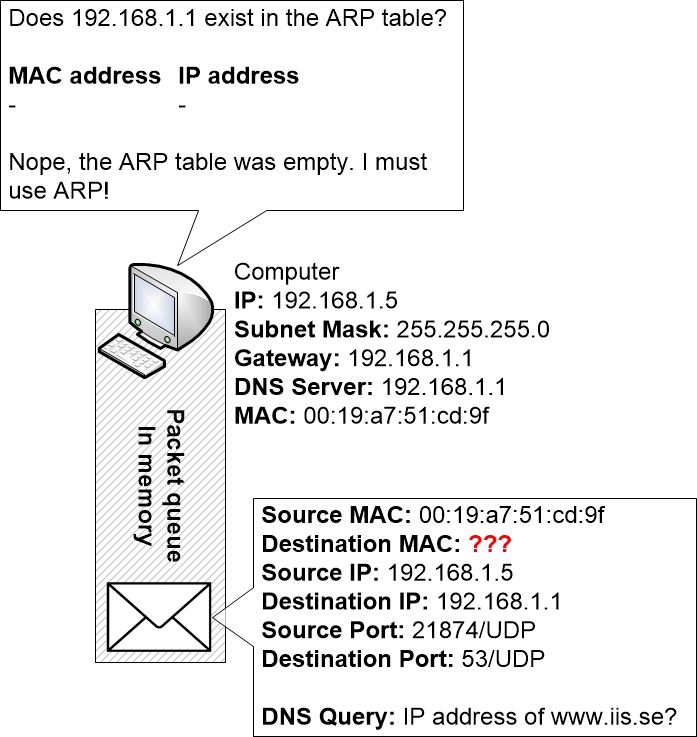
Step 2c: Check the ARP table for a valid MAC address
The computer will now check its ARP table to see if it knows what MAC address that is associated with the IP address of the router, 192.168.1.1
But the computer has a completely empty ARP table since it just booted up and hasn’t yet learned any ARP entries.
Step 2d: ARP request to the network
Now the computer must construct an ARP request to the rest of the network. The request will be sent to destination MAC address FF:FF:FF:FF:FF:FF which is the broadcast address. The result is that every other computer and device on the LAN will receive the request and read the contents.
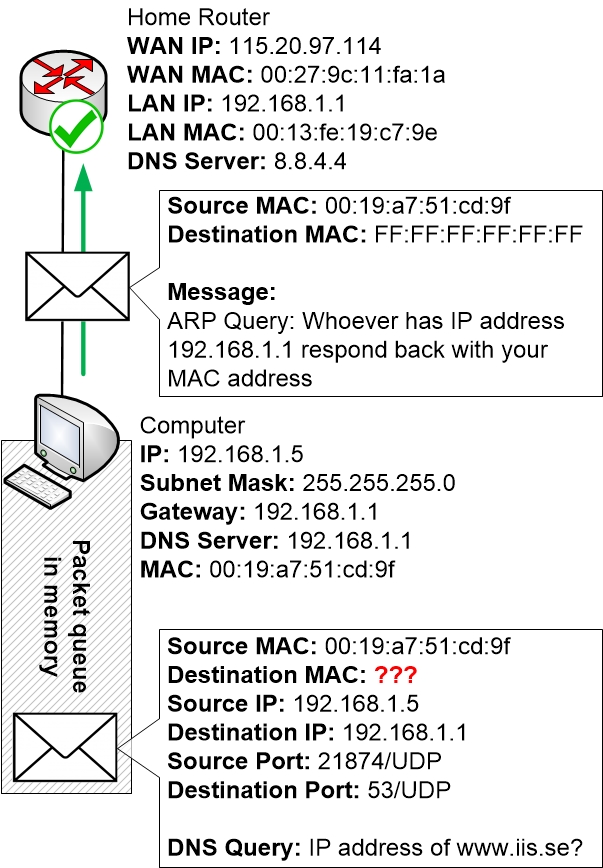
The home router receives the ARP request and reads the message since the request is sent to the broadcast MAC address FF:FF:FF:FF:FF:FF
The home router can see in the message that the computer is asking for the device with IP address 192.168.1.1. Because the router is configured to use that IP address the home router will respond to this message by constructing an ARP reply and sending it back to the computer.
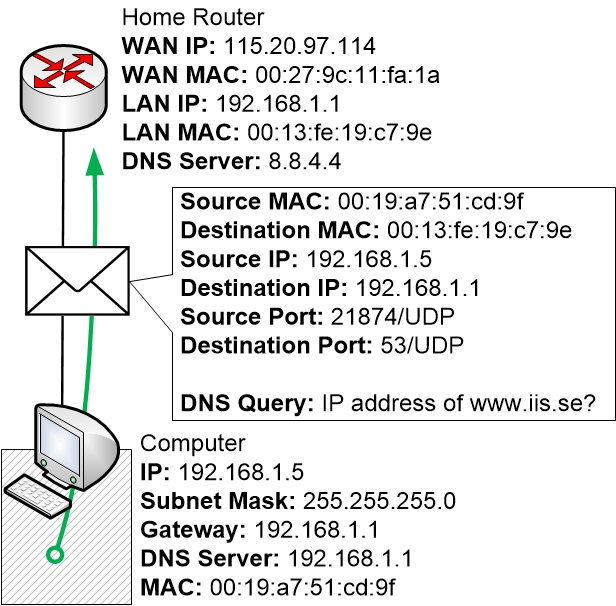
Step 2e: ARP reply from the router
When the ARP reply is received by the computer the OS will read the reply. It will enter the reply into its ARP table to remember for a few minutes which MAC address that is associated with 192.168.1.1

Now the computer finally has gathered all the information it requires to be able to send off the DNS message.
Step 2f: Send off the DNS query
The DNS query is now going to be sent from the computer to the DNS server, which exists as a service that is running on the home router 192.168.1.1
The home router receives the query, sees that it is a DNS query aimed at the router’s own IP address and MAC address, and understands that it must handle this DNS query and send back an answer.
Step 2g: The home router checks its DNS cache
The home router is a DNS server, but it is also dependent on other DNS servers on the Internet. The home router can’t know every single DNS address on the Internet. Instead, it will ask those DNS servers that are responsible for different domains (such as example.com) as needed.
The home router also has a DNS cache just like the computer. Every time the home router handles a DNS query from a computer it will also save the DNS reply in its own DNS cache for some time. This is to avoid having to handle the same DNS queries over and over and to speed up the response time.
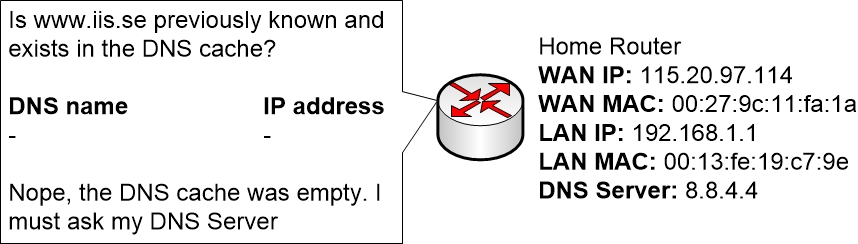
In this case, the home router hasn’t gotten any question about www.iis.se in a long time so it doesn’t exist in the DNS cache on the router. Therefore, the router must ask its configured DNS servers on the Internet to answer this DNS query.
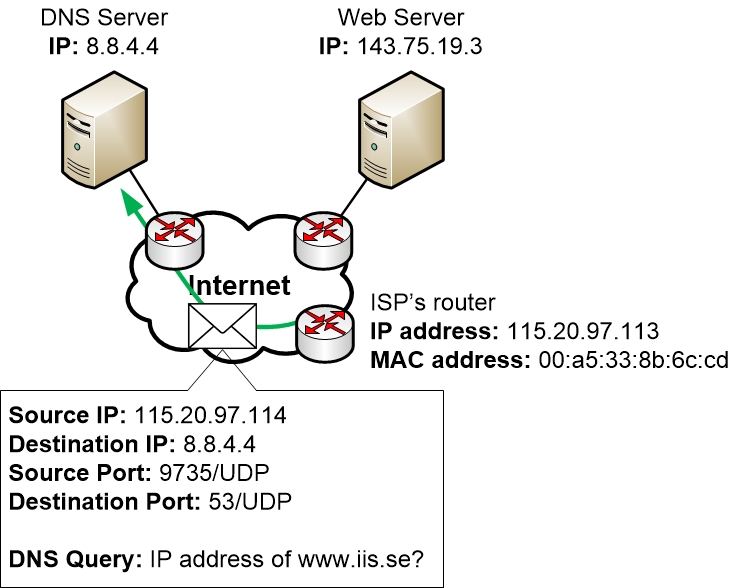
Step 2h: The home router prepares and sends away its DNS query
Now the router prepares a DNS query that it will send to its DNS server. The router learned about available DNS servers via DHCP from the Internet Service Provider when the home router first booted up and got its own public IP address from the ISP.
So the home router will prepare a DNS query for transmission by putting the query inside a UDP message with destination port 53/UDP and a random UDP source port. It will then put the message inside an IP packet. The IP packet is sent from the home router’s public IP address to the DNS server address.
When the home router has prepared the packet and is ready to send it, then the home router will look in its routing table to see which way it should send the packet. It can see in the routing table that the best path to the inside LAN 192.168.1.0 is via the LAN ports, but this packet should be sent to another IP network on the Internet. So the home router picks the WAN port as the best destination.
At this stage of the process, it is possible that the home router would have to perform an ARP request to find out which MAC address of the next hop router 115.20.97.113, but we assume that the home router already has got this information in its ARP cache.
Step 2i: The DNS query is routed over the Internet
Here a number of steps have been somewhat simplified and shortened.
Each router on the Internet that receives the DNS request will perform the following:
- Receive the packet
- Looks at the destination IP address to see where the packet is going
- Looks in its routing table to see which path that is best for the packet
- Removes the old MAC addresses from the packet and adds new ones. It will use its own MAC address on the outbound interface as the Source MAC address for the traffic, and will put the next-hop router’s MAC address as the destination MAC address
- Sends off the packet to the next hop router
Step 2j: The DNS server responds
Eventually, the packet reaches the DNS server which will handle the packet and prepare a response.
Just like a regular computer the server has an IP address, a Subnet Mask and a Default Gateway. So it works in much the same way as a regular computer.
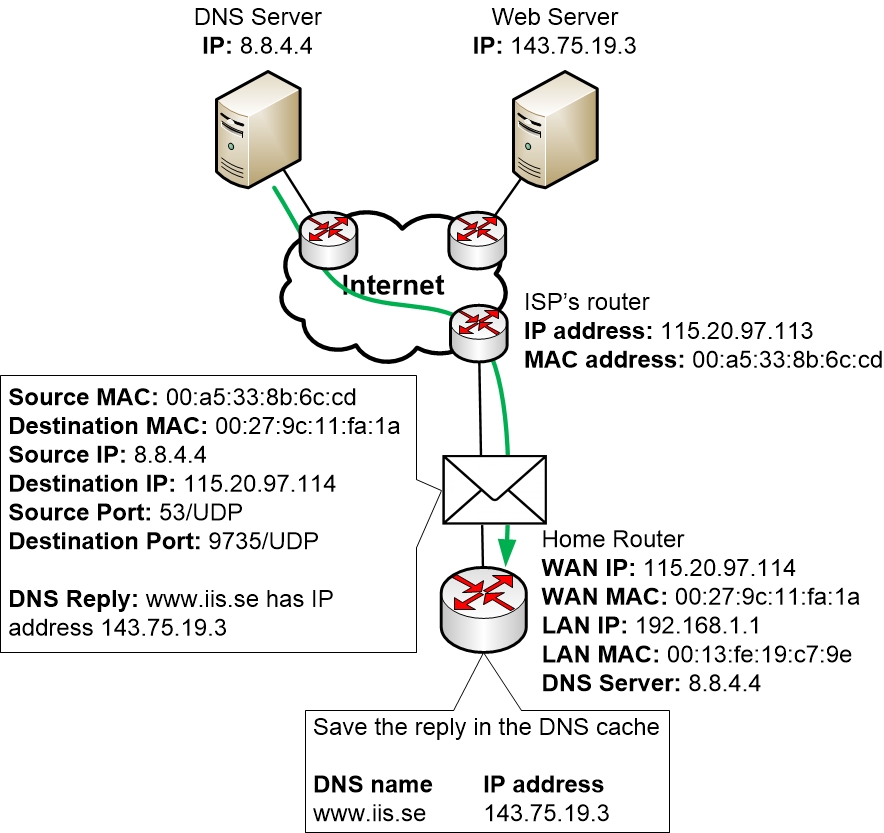
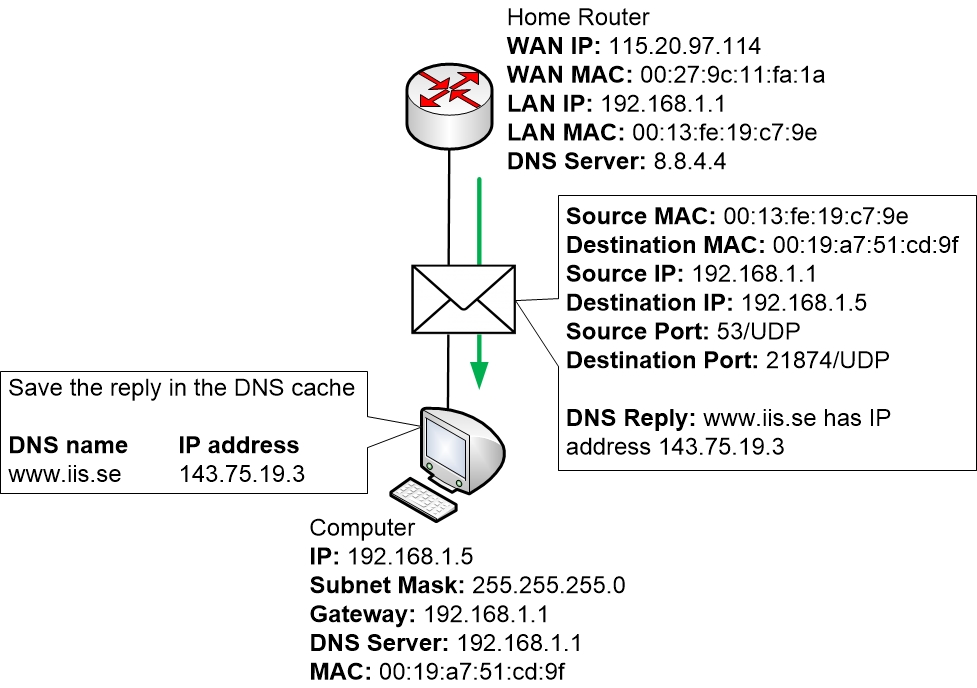
Step 2k: The home router can send a DNS reply to the computer
Now after receiving the DNS reply from the DNS server, the home router can finally create a DNS reply and send it to the computer to let the computer know which IP address that www.iis.se has got.
Step 3: The computer sets up a session to www.iis.se
During this part, a lot of things happen at once.
Mainly the computer will initialise something called a “TCP 3-way Handshake” which is a setup phase of TCP communication that consists of three messages between the computer and the server. When TCP is being used, as is the case with web browsing, TCP always tries to make sure that everything works as well as possible which includes setting up a session via a handshake. This is done to prepare the server for an incoming session and to decide which ports that should be used for the communication.
The TCP 3-way Handshake consists of three messages:
- The first one is sent from the computer and is called “SYN” which stands for Synchronise. It lets the other side know that we want to synchronise settings for a TCP session. The message also contains the random source TCP port that the computer has chosen.
- The second message is the reply back from the server and is called “SYN-ACK”, which stands for Synchronise Acknowledgement. This simply means that the server acknowledges that it received the message and that it also is prepared to set up a session for communication
- The third message is sent by the computer and finalises the session by sending “ACK” or Acknowledgement. This means that everything is now fully prepared.
The computer has got the correct ARP information for the IP address of the home router in its ARP cache. So the computer can send off any packets it wants to the Internet via the home router without first having to go through ARP lookups.
But this is also the first time so far in this example that the computer wants to communicate directly with something that is located beyond the router. The TCP 3-way handshake will take place directly between the computer and the Web Server on the Internet.
Earlier during the DNS lookup process, the computer just talked with the Home Router. The home router, in turn, talked with the DNS servers on the Internet. But no communication was travelling directly between the computer and any IP address on the Internet.
The difference is that now that the computer wants to communicate directly with something on the Internet then the home router has to perform Address Translation for the traffic.
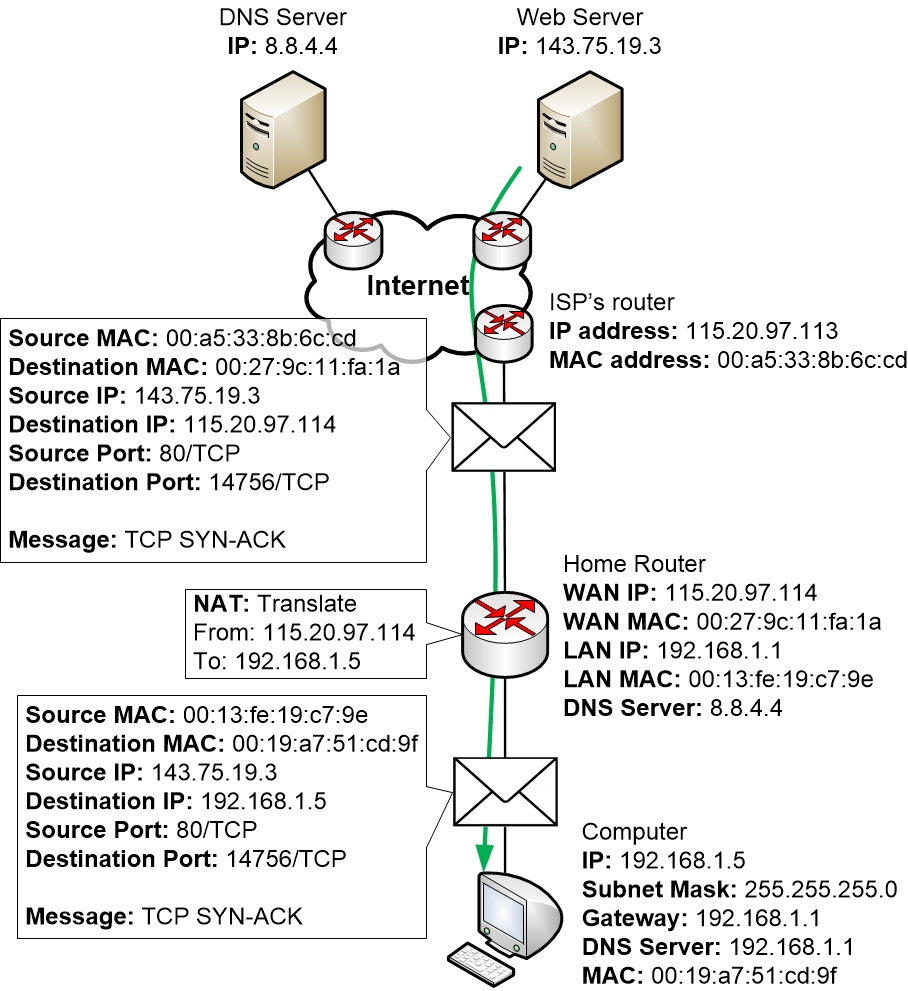
Step 3a: The computer sends a TCP SYN message
Here we take a closer look at what happens when the computer is establishing the TCP session by initializing the TCP 3-way handshake.
To do so, the computer OS will randomise a TCP source port that it will use for the communication. Then it assembles the TCP SYN message and sends it to the Web Server. The TCP message doesn’t contain any other data. It is just an empty TCP message.
When the TCP SYN message passes through the router the router will perform NAT on the message. The router will also save information about the performed NAT in its NAT table so that it can keep track of the session and perform reverse NAT on any replies.

The picture shows a TCP SYN travelling from the computer to the web server
- “I would like to synchronise a TCP session with you”
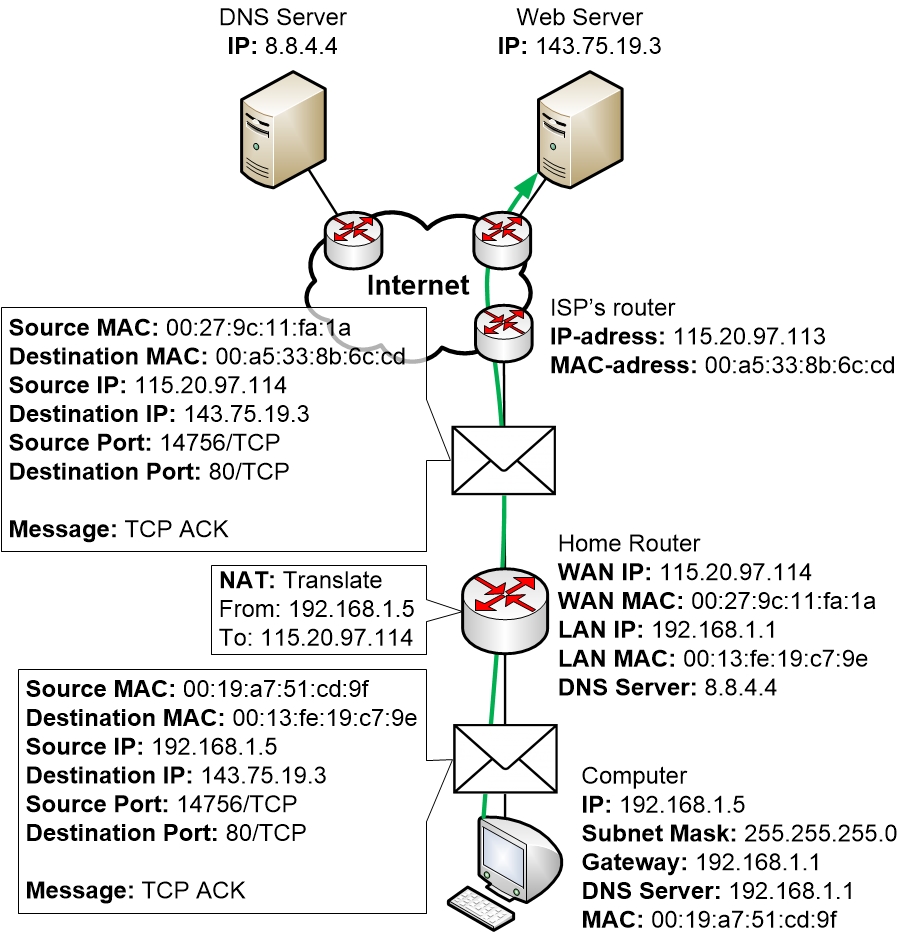
Step 3b: The Web Server replies with TCP SYN-ACK
Here you can see the returning TCP SYN-ACK response from the Web Server to the computer:
- “Okay, I’m good to set up a session and I confirm that I got your message”
The packet matches the NAT table entry on the router so that the router can see which LAN computer it should forward the packet to and how it should perform NAT on the packet.
Step 3c: The computer sends a TCP ACK
Finally, a TCP ACK is sent from the computer to the Web Server
- “Then I confirm that from now on we have established a session!”
As long as the computer and the server keep on communicating with each other they will keep using the same session for the communication. This also includes using the same TCP ports, which lets all devices along the way keep track of the session, the address translation and so on.
The session could last just long enough to download the web page, or the web server and the computer could choose to keep the session alive for longer in case the user wants to keep browsing around on the web pages.
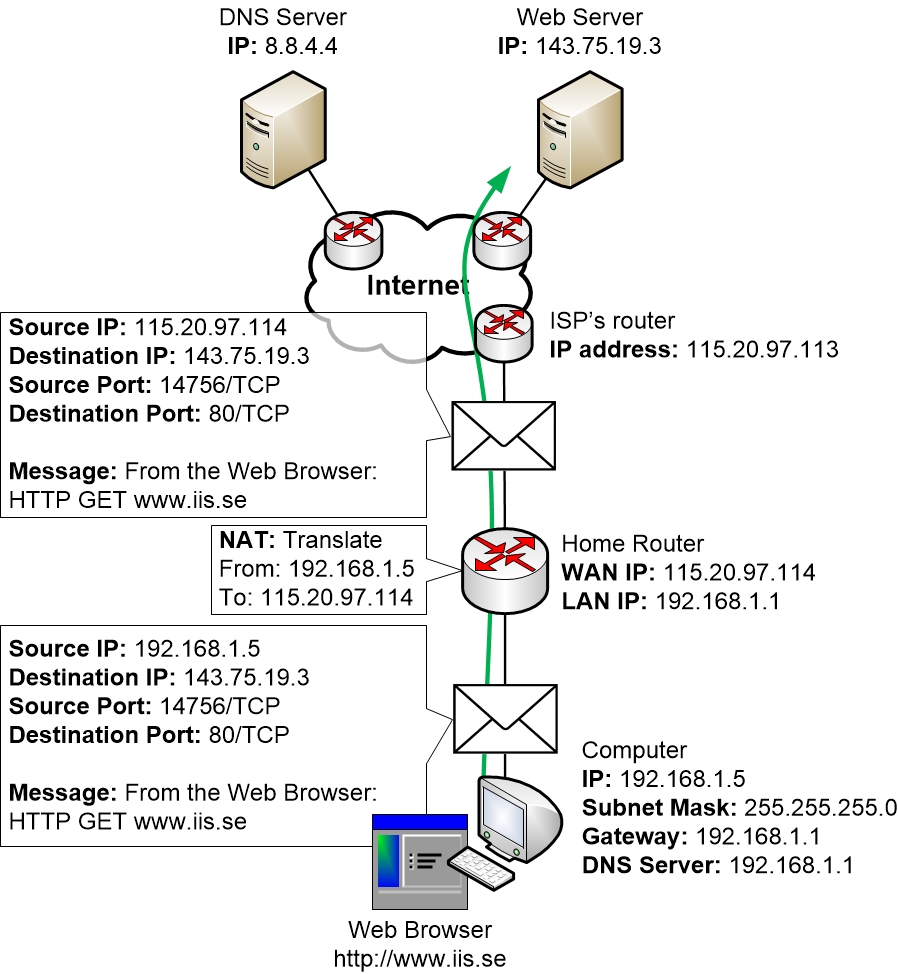
Step 4: The web browser talks with the Web Server
Once the TCP session is established by the OS then the OS will let the Web Browser know that it is now alright for it to start communicating with the Web Server.
The web browser will do this by using the HTTP protocol, which is the standard protocol for transferring web pages on the Internet
This also means that we have concluded the example including most steps that are involved with setting up the communication. From now on the computer and the server can communicate with each other to transmit the web pages until they are done. Then they can choose to end the session by sending a so-called TCP RESET message if they want, which lets all devices know that the session has now ended.
|
Previous part: |
Next part: |