First we can look at a few quick general tips to help you investigate, measure and improve your wireless network.
Quick tips for a better Wi-Fi network
- Place the Wi-Fi router in a central location in the area where you want good wireless coverage. Wi-Fi routers radiate radio signals omnidirectionally, in all directions. You can increase both the coverage and the overall quality of the wireless network by moving it to an open area.
- Wi-Fi signals are blocked by most everything. Walls, glass doors, furniture, floors, cloth and so on. So it is absolutely best if you have a completely free line of sight between the antenna of the router and your wireless client. Many people wish to hide away their ugly Wi-Fi routers, putting it behind things, underneath stuff or in cupboards. This is generally a bad strategy for obtaining a good wireless signal.
- It is simpler if you imagine radio waves behaving much like light. If you can see the light source (you have a clear line of sight) the light is brighter. You will still see the light indirectly even if you don’t have a clear line of sight because the light bounces around the room. But the best signal quality is achieved if your computer can “see” straight to the antenna of the Wi-Fi router.
- You can use apps on your phone to measure how good signal strength you get from your Wi-Fi router in different rooms. WiFi Analyzer is such an app for Android. Then you can measure and customise your Wi-Fi installation to work in the best way possible. Try moving the Wi-Fi router around to see what effect it has on your wireless network.
- You can also use speed tests on the Internet (google for “speed test”) to measure your download and upload speeds at different locations. First run a test using a network cable between your access point and your laptop to see which results you should expect under perfect conditions. Then disconnect the network cable and run the test again over the wireless network. Start off nearby the access point with a clear line of sight between your laptop and the access point, and then move around to various locations where you might want to use your wireless network
- Sometimes, moving the access point just up to a few meters can drastically change how the radio signals bounce around in your home. Experiment to see if you can improve the signal quality further away in your home by moving your access point.
- Wi-Fi radio waves dislike closed doors. Closing the door to a room could be the tipping point that changes the wireless signal strength in the room from acceptable levels to being more or less unusable. While testing your wireless network during the implementation you have to be aware of this, so that you perform the tests under similar conditions to how you will be using the network later on.
Setting up a wireless network
Here are the general steps you should take when setting up a wireless network if you want to follow in the footsteps of more professional Wi-Fi engineers. We encourage taking notes and sketching down floor plans to visualise your network environment while you are working with your plan.
The steps described below can also give you clues to the type of things that you need to consider. For example, if you right away come to the conclusion that some family members will be streaming films to the TV while others will be using their gaming computers in rooms on the second floor, then you have already identified a potential problem that you have to take into consideration.
Step 1: Investigate your current situation
- Where is the Internet connection delivered at your house?
- Through a phone jack perhaps?
- In a fiber box in your basement?
- In your living room through a cable connection box?
- What type of Internet connection is it?
- Fiber
- DSL
- Cable
- Based on the above, is it possible to move the placement of your home router?
- This is important to determine if you will be able to choose where your Wireless home router will be located.
- Can you extend the cable to move the home router if required?
- Perhaps you can run a network cable from your router to a switch further away and connect devices to the switch?
- How big is your home?
- How many square meters and how many floors do you have?
- What type of walls does your home have and where are they located?
- Concrete?
- Wood?
- Plaster?
- Where will your users be?
- Draw hot spots on your floor plan to mark areas where your users will be using their wireless devices
- What type of throughput or speed does your applications or programs require?
- Video streaming (youtube, Smart TV, Media Server) is among the most demanding use cases
- How many people or devices will be using the Wi-Fi at once?
- Are they all in the same place or spread out over multiple rooms, floors, areas?
Step 2: Produce a plan based on the prerequisites
- Make a guess as to how big coverage area you can get from the access points you would like to install. Usually, the supplier or manufacturer can list some highly optimistic numbers for “indoor use” that you probably need to cut at least in half to get a more realistic overview.
- Place the access point(s) where you would want them on your floor plan.
- Start with a single access point.
- Use line of sight from the perspective of the access point on the floor plan. Are there a lot of walls in between the access point and other areas you want it to cover? Are those concrete walls? The more walls and the thicker and more solid they are, the worse the signal generally gets.
- Where would you potentially have to add extra access points?
- Use this floor plan to try to make guesses as to how you should place your access point(s)
Step 3: Test your plan
- You need at least one access point that you temporarily connect and set up in the way you imagined in step two. Perhaps you could borrow a similar access point or router from a friend, or your ISP could have provided you with a home router with built in Wi-Fi as part of the service.
- Take a laptop and walk around the house to test in different spots what type of connection you actually get. Make sure to perform the tests in a way that mirrors how you would later be using the wireless network at that location.
- Run speed tests to see what internet connection speeds you get at the different spots. Concentrate on the areas where you imagine that you will need to use your wireless network the most, and where you want the highest throughput, but also check other areas where you know that you will definitely need or want wireless coverage.
Step 4: Adjust the plan
- Based on your results you might move the access point to another area to improve the coverage of one or more of your important usage spots.
- You might also conclude after trying multiple placements of the Wi-Fi router or access point that a single access point is simply not going to be enough for the whole house, and you might have to get another access point.
- Go back to main step 2 and produce a new adjusted plan using another access point if necessary, then test the new revised plan again
Example: Small apartment
Most people start off with the assumption that you probably only need a single wireless access point and that it will be enough with the built-in Wi-Fi that you have in your home router. This is usually a good strategy for smaller apartments. Up to 80-90 square meters is rarely a big problem, depending on the layout and building materials. You might end up with a somewhat worse wireless connection in some rooms, but you will probably have good enough wireless network quality no matter which room you are in.
Always plan to put your Wi-Fi router in the room where you will require the best wireless connection. For a lot of people, this would be the living room where you might end up sitting with both mobile phones, laptops, Smart TV’s, Apple TV’s, streaming boxes and other media devices. The further away and the more obstructions between the client and the Wi-Fi router, the worse signal quality you get, which leads to lower throughput and a Wi-Fi connection with worse quality.
So you really want to put the Wi-Fi router in the room where you have the biggest need for a fast and undisrupted wireless network.
Once you picked a room where you would like to install the Wi-Fi router you have to investigate if you can place the router there. Sometimes the Internet connection is handed off in a cable jack, phone jack or fiber box somewhere else in your house.
Depending on what type of Internet connection you have it can be easy or more difficult to extend the cable to the location where you want to place your router. A phone line can often be extended from the phone wall jack quite far away before the signal gets too bad. The same goes for a fiber box, which typically lets you run a network cable from the fiber box to your router. The network cable can be run for a length of up to about 70-100 meters before the signal becomes too bad, so you shouldn’t have any issues with extending such a connection to where you want to place your Wi-Fi router.
If you have a cable provider then maybe you can put a separate cable modem by the cable wall jack, and then run a UTP network cable between the cable modem and your router. This is unless the cable modem is integrated into the router that the cable service provider has given you. Then you would have to buy a separate cable modem and a separate router.
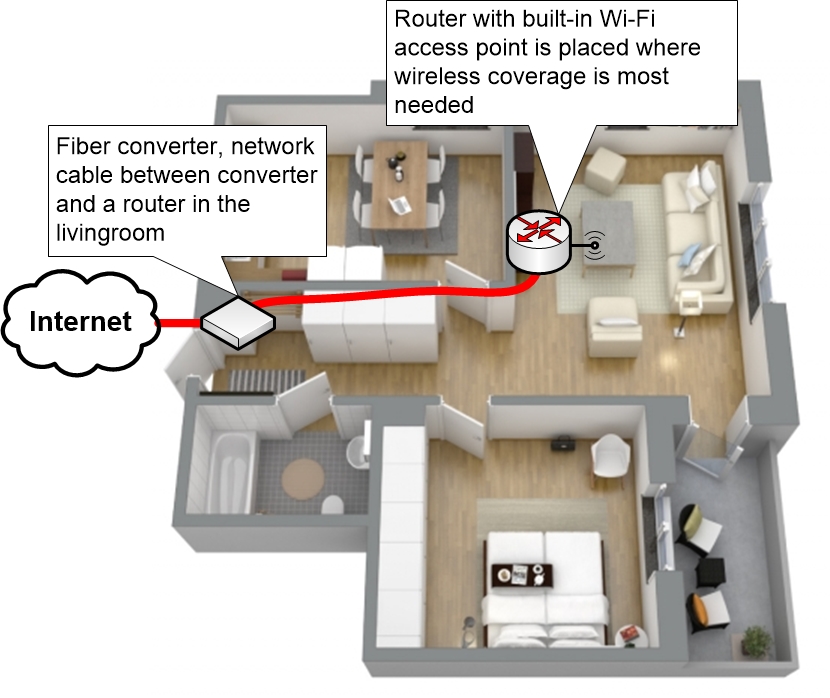
If you can extend the connection to your Wi-Fi home router location of choice, then do so and place the router there. You can then test your wireless network to see if it works as well as you want. Concentrate on the more important rooms, but try the wireless network everywhere where you think you might want to use it.
During your tests, use multiple devices including your phones and your computers that you are actually going to be using later.
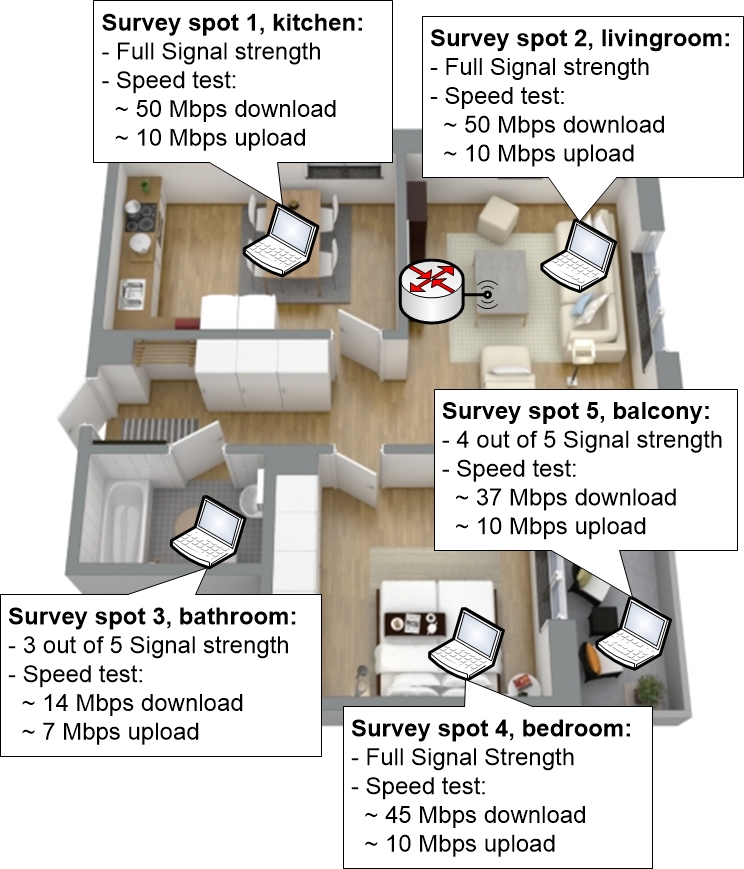
If you get bad results anywhere then you can try moving the access point up to a couple of meters in different directions to see if it makes any difference. Sometimes small adjustments to the access point placement can make a big difference.
Example: Bigger apartment or house
When would you need more than one single access point? When is a house big enough that a single access point is not enough?
The answer to that question is simply when it is no longer enough with a single access point to get adequate wireless network coverage in all of the areas that you want to have good network coverage in.
Often this would be something that you would notice after the fact, once you have already installed your wireless network. This is why we recommend that you should never install your equipment permanently until you have made a few tests, to see if you obtain results that you are satisfied with.
Professionals that install wireless networks for a living often fall back on their experience, looking at floor plans with their knowledge about wall materials, furniture etc to try to estimate how many access points that are needed for a specific building. But it also depends on exactly which access points that are used, which clients that will connect to the network and how they work, which requirements that the applications, programs, clients and users put on the wireless network and so on.
A network engineer also knows that experience is not enough for more complicated wireless setups. Instead they might use predictive site survey tools which are programs where you can enter floor plans, construction materials and other input factors. The tool will then calculate and present an estimation of the number of required access points and their placement.
Once they have an estimation ready they will use it to set up the network and do a so called Site Survey, where they install the access points temporarily and perform tests throughout the building to see if they get the results they wanted.
The aforementioned tools are prohibitively expensive for private use. But following the steps in the plan above you can mimic what the tools do.
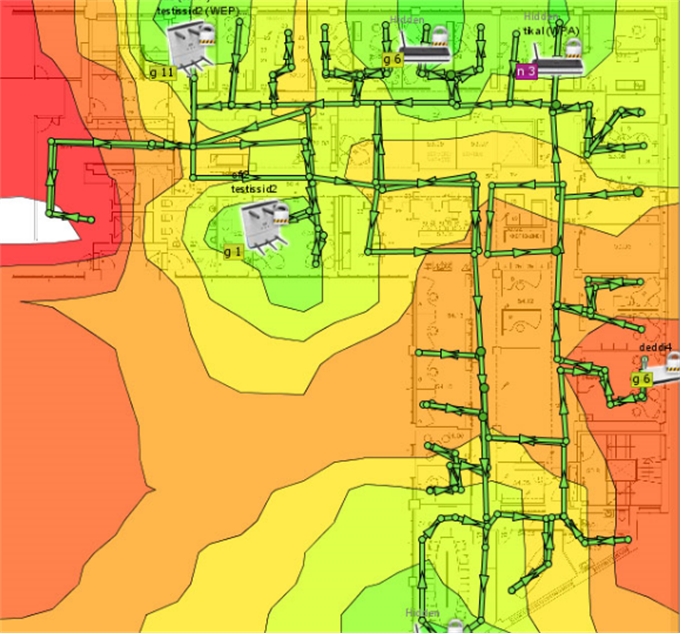
Example of a “site survey application” that will try to estimate the number of required access points based on a number of input factors
During the site survey the network engineer will often find multiple issues that have to be corrected before the network is delivered and handed off to the customer. As soon as the installation requires more than a few access points it actually gets really difficult to plan a wireless network, at least if the applications have high requirements.
Luckily, in a home network there is rarely a big need for clients to have an undisrupted Wi-Fi connection as they are moving around in the home. Rather there are a few hot spots where users will be using their wireless devices. This makes it a lot easier to setup the wireless network.
There are also a few shortcut questions that would normally indicate if you will require more than one access point:
- Are there multiple floors where you need good wireless coverage?
- Does each floor have more than maybe 80 square meters?
- Do you have multiple concrete walls, stone walls or other dense building materials that cut through the house?
- Do you need to cover any additional guest houses, outdoor areas or gardens?
If the answer to at least one of the above questions is yes then you might need more than one access point. Often a good basic estimate is one access point per floor, unless each floor is also really big. Basements where all surrounding floors, walls and ceilings are made out of concrete or stone materials are especially tricky radio environments and will require an access point of its own for good wireless signal quality.
Another reason for why you might want to have more than one access point per floor is if you want especially good radio signal quality and throughput in more than one place. You might have a living room where you need good throughput, but you also have a recreation room with entertainment systems that also need the best possible Wi-Fi connection. You might then have to put an extra Wi-Fi access point in the recreation room to achieve your goal.
When you build such a network you can do it in two different ways. The cheaper typical do-it-yourself way, or the more optimal but a bit more expensive way.
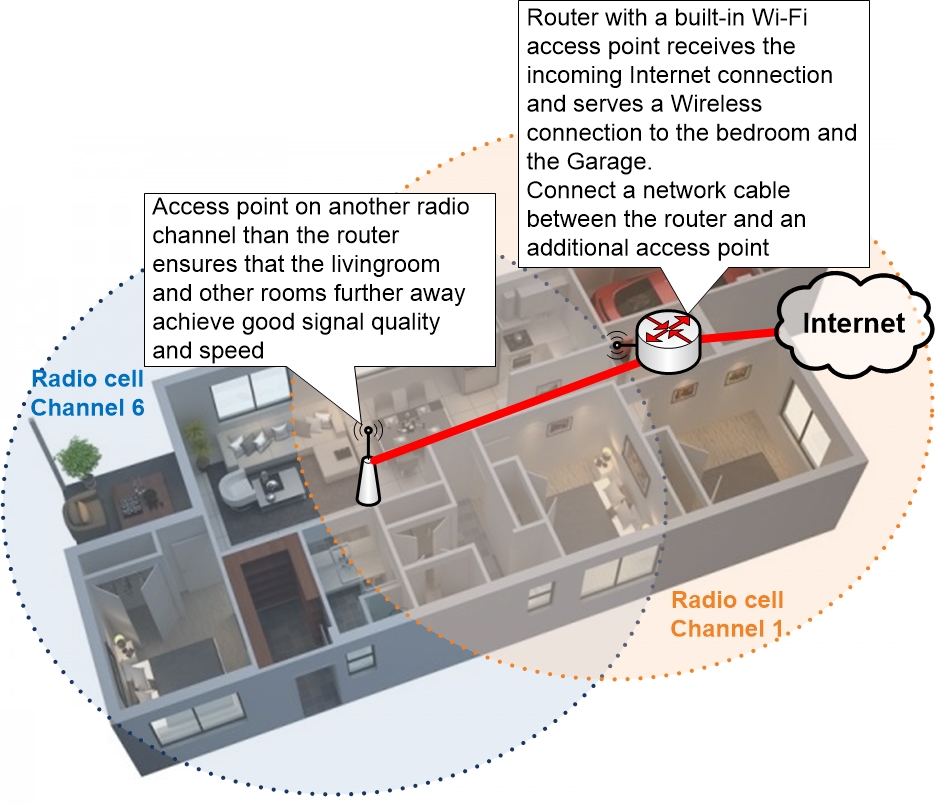
The cheaper way consists of using your home router with built-in Wi-Fi as the first access point and place it in the first location. Then you add a second pure access point that does nothing but act as a wireless access point and place it at the second location. The second access point will be connected with a network cable to your Wi-Fi home router.
This setup is very similar to the last setup on the previous page, where the LAN port of a second Wi-Fi router was connected to a LAN port of the first Wi-Fi router. The main difference is that using an access point is a cleaner solution using equipment that is meant for the task, and you can also more easily add a third or a fourth access point to the solution.
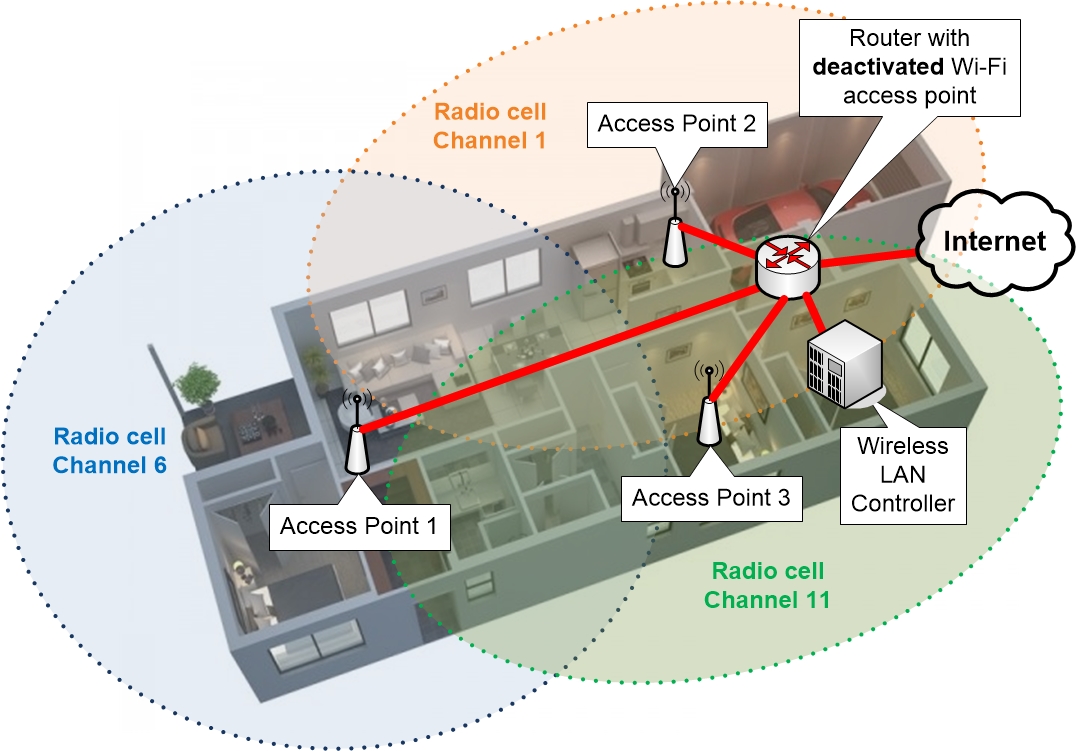
Each access point must use different radio channels that do not overlap. On the 2.4GHz band you should pick from channels 1, 6 and 11 and let each access point use a unique channel out of those three.
The only downside of this solution is that you still do not have a completely uniform wireless network. Even if the access point and the home router are configured with the same wireless settings they will still not cooperate in any particular way. They are just two separate devices that happen to announce the exact same wireless network. Clients that connect to this wireless network will perceive it as if there are two access points on the same wireless network, but it will be up to the clients to determine when and how they want to switch over between the two.
The more expensive but also much better way of doing it is to buy into a wireless controller based solution that is discussed below.
Wireless LAN Controller based solution
A Wireless LAN Controller (or WLC for short) is a device that controls access points which are registered in the Controller and makes the setup of the wireless network more automatic. This includes which channels that are used, which effect the access points operate on etc. The WLC will optimise and adapt the radio environment of your access points automatically and can also keep optimising it continuously based on changes in the radio environment, for example if your neighbours set up new access points of their own.
A WLC based solution consists of the following parts:
- Wireless access points
- Wireless LAN Controller
The WLC is what you will configure, often via a graphical interface in the WLC that you connect to in your web browser. The WLC then tells the access points what they should do, which channels they should operate on, what SSID network name they should announce and so on.
The WLC can be either a physical device that looks something like your home router, or it can be just a program that you can install on your computer, which turns your computer into a WLC by the use of a program or service that is running in the background.
Ubiquiti UniFi is a great example of a popular but yet affordable Wireless LAN Controller based solution for both home and corporate use. In their case the WLC consists of an application that you install on a computer in your network.
Their WLC application is free-of-charge but can only be used together with the Ubiquiti access points. The price point of the solution is therefore decided by which access point model that you are interested in and the number of access points that your home network requires. You can always add additional access points later on if required.
Another benefit is that these access points can be powered via the network cable, so you only need to install a single network cable to each access point.
Ubiquiti UAP-AC-PRO is their high-end solution which is rated for AC1750. UAP-AC-PRO-US is meant for the US market and has the US radio frequency bands enabled. UAP-AC-PRO is meant for the international market and allows for all international radio frequency bands.
Ubiquiti UAP-AC-LITE access points are rated at AC1200. They offer a lower price point compared to the UAP-AC-PRO but does so at the cost of somewhat lower performance. UAP-AC-LITE-US is meant for the US market and has the US radio frequency bands enabled. UAP-AC-LITE is meant for the international market and allows for international radio frequency bands.
Working with a WLC solution
When you install a WLC based solution you would set up your home router as usual and place it wherever you like. You would then log into your home router and disable its built-in Wi-Fi. Once that is done you would install the Access Points in your home, connect them to the router or a switch using network cables, and then start the Wireless LAN Controller program on your computer to configure the access points.
By doing this you would end up with a network that costs a bit more, but you would also have a wireless network with professional quality. You can easily add additional access points later on to increase the total coverage area or to increase the throughput of specific hotspots.
Most Wireless LAN Controllers will support a mixed environment with different access points. You could install an access point with 802.11ac support in the livingroom, while your guest house gets a cheaper 802.11n capable access point.
If you want to make a configuration change you will only have to log into your WLC instead of having to connect to each single access point individually to perform the same change multiple times. The WLC will push any configuration changes automatically to your access points. Wireless networks also benefit a lot from being updated with more recent software versions in the access points, to fix issues and to add support for new features which will improve your network. Software updates can also be installed on your access points from the WLC.
The Wireless LAN Controller also takes care a lot of other things for your wireless network, making it function much better. One such thing is Roaming, which is when a wireless client such as a mobile phone is moving from one access point closer to another access point and wants to swap over between the two. This is usually handled somewhat poorly by the wireless client if it has to do it on its own. But by using a Wireless LAN Controller based network the Wireless LAN itself will help the client in different ways to roam between access points so that it can become completely seamless to the client and to the user.
The WLC can also detect disturbances and changes in the radio environment and make automatic adjustments to your access points, making them function better over time.
All in all, if you can afford buying into a solution with a Wireless LAN Controller based Wi-Fi network, then it will be the biggest long term improvement you can possibly make for your wireless network.
Using cables
“But I want to build a Wireless network!”
Many people want to move completely over to a fully wireless network, but never end up with perfect results no matter how hard they try.
The truth is that wireless networks aren’t the perfect solution to any given problem. Even though the wireless network standards improve all the time there are lots of problems that are still difficult to solve with a wireless network.
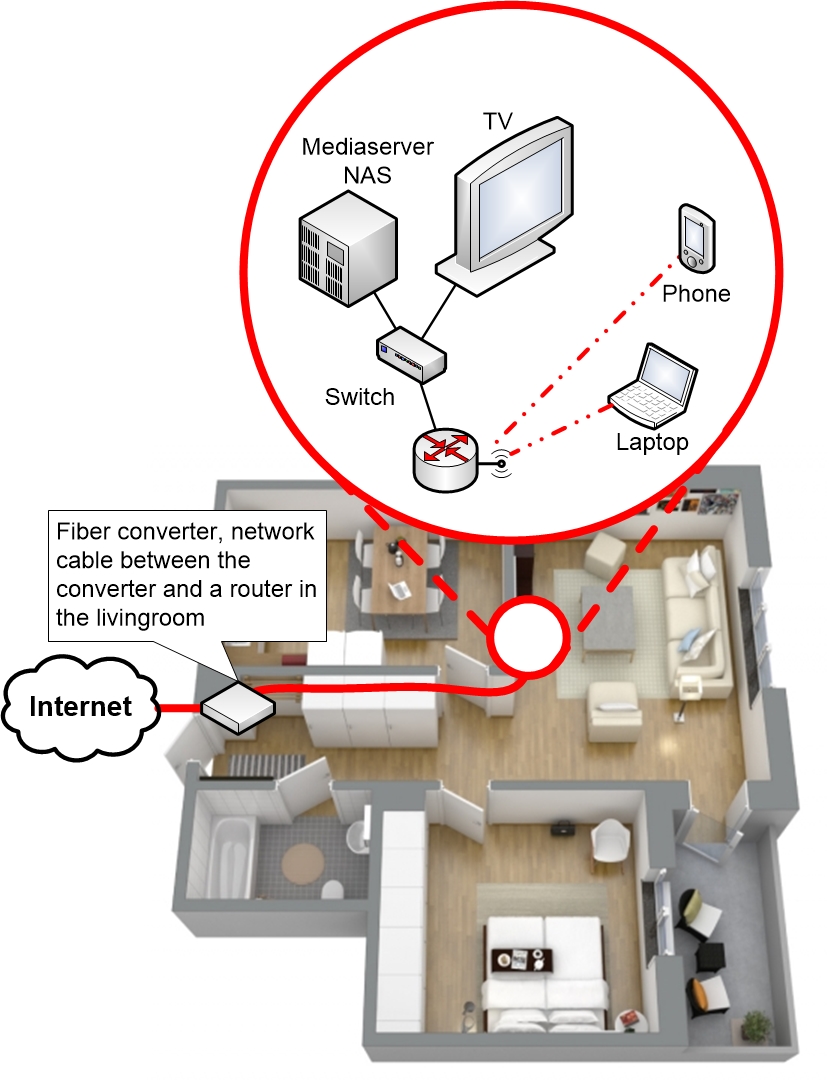
One of the most important tips we can give you is therefore to reconsider and actually connect your more important devices using network cables. Consider those things that never move around and which require the best quality network connection, such as your gaming computer, the Smart TV, your media player and the NAS device where you store those films that you want to stream over the network.
All of the mentioned devices place high demands upon the network communication and are typically sensitive to packet loss, latency and other types of disturbances. When such disturbances do occur you also notice them very easily through decreased or varying video quality, lagging or stuttering streaming and buffering. Many of the devices are also often physically placed permanently close to each other, nearby your TV set.
In truth, the best way to solve the network connection for devices like these is to place a small switch close to the devices and then connect them to the switch using network cables. No matter what happens on your wireless network they will still have a consistently performing network connection.
With a wireless network there are no guarantees that you could ever hope to avoid disturbances completely. Even with the best available equipment you could be unlucky. Civilian or military Radar can disturb 5GHz equipment. Microwave ovens will have negative impact on 2.4GHz. Or maybe your neighbour buys some other type of solution that operates on the 5GHz band and which interferes with your wireless network.
All we are saying is that the one way to guarantee a good network connection is to use network cables to connect your most demanding devices.
|
Previous part: |
Next part: |